How to test a glow plug
The glow plugs are components in a diesel engine used to raise the temperature inside the combustion chamber. The warmer temperature inside the combustion chamber makes starting a diesel engine easier and faster.
Sometimes, we get the wrong action to turn on the car's glow plug. It is understandable because each car brand has its way of turning on the engine's glow plug. Some cars use two glow plug indicator lights, red and green lights. Some cars only use one indicator light.
To ascertain this glow plug problem, we need to make sure to turn on the glow plug correctly before checking the glow plug itself. Here's how to start a glow plug on a diesel engine correctly:
- Turn the ignition switch to the ON position.
- Pay attention to the glow plug indicator light. When the engine is cold, the glow plug indicator light will turn on, and the glow plug will immediately work to heat the combustion chamber in the engine. Generally, suppose the engine temperature is hot. In that case, the glow plug light indicator will still go out (off) even though the ignition is on.
- Wait for the glow plug indicator light to turn off automatically. The glow plug indicator light will change from red to green for glow plug systems that use the two-colour lamp type. And for systems that use one lamp, the glow plug lights will go out when sufficient warm-up time is reached.
- Start the engine as soon as the glow plug indicator light turns green or the glow plug light turns off. The glow plug indicator light that goes out or turns green indicates that the engine room's hot temperature has been reached. It makes the engine is easier to start.
If you start the engine before the glow plug starts or it takes too long after the glow plug lights go out. It will make the temperature inside the combustion chamber cool again and make the engine more difficult to start.
When you find the diesel engine difficult to start if it is cold and easy to start when the engine is hot, it can indicate that the glow plugs and glow system on the diesel engine are in trouble or have a problem.
To be sure, the easiest way for that problem is to check the glow plugs first. So how do you check the glow plugs on a diesel engine? In this article, we will share tips on how to test a glow plug.
But before the inspection, you should first remove the glow plug from the engine. Here's how:
- Remove the negative terminal of the car battery for safety during the inspection.
- Open the plate that is tied by a nut to each of the heater plug connector terminals.
- Remove the plate from the glow plug.
- Use a special key ring to remove the glow plug.
- Do it on the entire existing glow plug.
After all the glow plugs are released, the next step is to test the glow plugs. Here are the steps for testing the glow plugs.
I. Testing the glow plug's resistance
The first step to being done on how to test a glow plug is by checking the glow plug's resistance. Use the multimeter to do this test. Because the resistance possessed by this glow plug is relatively small, you should use a digital ohmmeter. The accuracy and reading of the glow plug resistance value with a digital ohmmeter can be more accurate and correct.
From some of the literature that we get, the value of glow plug resistance ranges from 0.5 to 5 ohms, but for the exact value, look back at the vehicle repair specification book you have.
Suppose the glow plug resistance is more than 5 ohms or points to an "infinite" condition during the measurement. In that case, the glow plug is considered damaged and needs to be replaced with a new one. Pay attention to the steps and how to test the glow plug's resistance below.
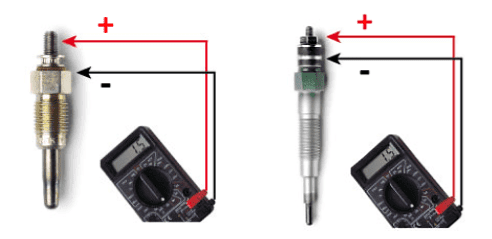
- Set the ohmmeter switch (knob) for resistance measurement (ohm).
- Attach the red (+) wire to the connector end of the glow plug.
- Install the black (-) wire on the body/glow plug housing.
- Read the resistance value on the glow plug that appears on the ohmmeter screen.
- If the glow plug's resistance is below 5 ohms, it means that the glow plug is still good. If it is more than 5 ohm or reads infinitely, then the glow plug is damaged.
The following image is an example on how to test a glow plug using the ohmmeter.
II. Test the heater work on the glow plug
The next test for the glow plug is checking the work of the heater on the glow plug. This test is to make sure the heating condition on the glow plug can work properly.
Before testing the heat, you should prepare one good condition cable and a car battery. Also, tap a little oil or diesel right on the tip of the glow plug.
This oil, when exposed to heat, will evaporate and become smoke. If the glow plug is in good condition, this oil will evaporate. Pay attention to the steps and how to test the heater work on the glow plug below.
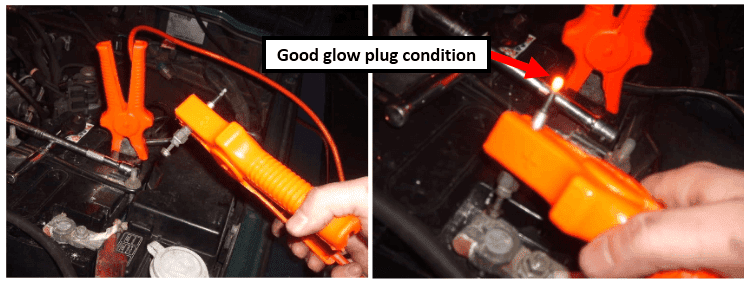
- Install the cable on the glow plug body housing.
- Connect the other end of the wire to the negative (-) terminal of the car battery
- Attach the glow plug terminal connector to the positive (+) terminal of the car battery
- Wait for 6-10 seconds.
- If the glow plugs appear red and smoke during this time, the glow plug is in good condition.
- If smoke isn't coming out and the glow plug head isn't turning red, then the glow plug is damaged and needs to be replaced.
The picture below is an example of how to test a glow plug with a battery to ensure the heater's work on the glow plug.
Also read:
Things to consider when doing this inspection
- Be careful about the heat generated during the test, as it can cause burns and injuries.
- Do not test the heater for too long, just 6-10 seconds, because it can damage the glow plug.
- Do not slam or drop the glow plug, as it may break or damage.
The two steps of checking the glow plug above are enough to ensure that the glow plug is in good condition or damaged.


